For the English guide, just click on the selector right up here
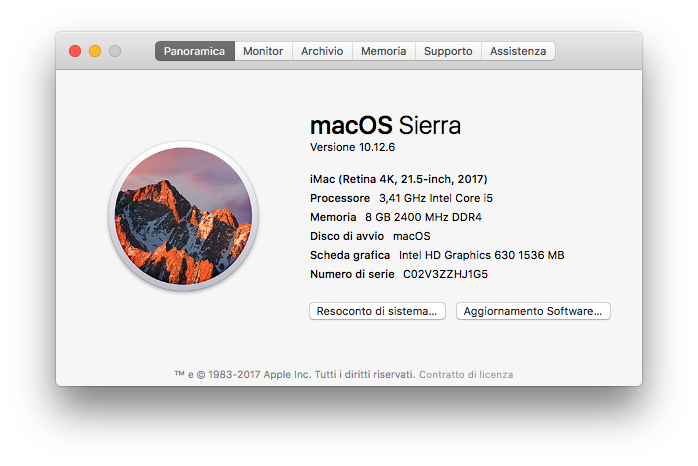
Non è stato per niente facile, ma ne è valsa la pena! Un Hackintosh (quasi) completamente funzionante!
La seguente guida non è raccomandata ai nabbi (nonostante ne sia uno io stesso), a meno che non tu voglia perdere un sacco di tempo anche solo per riuscire ad effettuare il primo avvio, ma ti assicuro che il risultato vale tutti i mal di testa che ti verranno dopo!
1. La mia build
Cominciamo con la mia build. L’ho assemblata circa 7 mesi fa, e mi è costata qualcosa tipo €500. Adesso potrebbe costare anche 100 euro in meno, ma sono comunque felice del risultato ottenuto con quel budget.
Il mio intero setup comprende:
- una MSI H270 Gaming M3, una mobo serie 200, con una striscia di LED rossi a lato ed una bella estetica dopotutto. Vale i €126 spesi, ora €116*.
- un Intel Core i5-7500, un Kaby Lake a 3.4Ghz con 6Mb di cache. Comprato a €211, ora a €184*
- un Western Digital Blue 1 Tb a 7200RPM HDD. Davvero solido. Ottimo prodotto per i 51 euro che mi è costato* (prezzo che ha mantenuto).
- un singolo slot di RAM Ballistix Sport LT. 8 Gb DDR4 a 2400Mhz di clock. Buon affare per €54, considerato che ora costa più di €10 in più.
- un PSU Corsair VS450, certificazione 80+ ed ottima qualità a €41*. Comprato per via di un non pianificato acquisto di una GPU, ora me ne pento un po’, ad essere sincero.
- ed infine, il Carbide Spec-03. Stupendo case ATX, con un bel pannello laterale in plastica, dotato di due silenziosissime ventole Corsair (una LED e l’altra no). Ha mantenuto il suo prezzo di €65.
I prezzi sono riferiti a quelli su Amazon.it nel Marzo 2017
Ma potresti chiederti.. perché non un alimentatore più potente? Perché non una scheda video dedicata a posto di quella mer$!osa HD 630? O ancora, perché non un dannato SSD? Beh, sono stato stupido. Un povero stupido. Non pensavo e non avevo soldi. Soprattutto in questi mesi, assieme al prezzo delle GPU di fascia alta per il bitcoin mining (grazie cari, vi auguro di perdere tutti i bitcoin che avete minato finora), gli shop italiani, sia fisici che virtuali (come Amazon), hanno pensato bene di alzare i prezzi. Di tutto! Anche CPU, GPU di fascia bassa ed SSD. Quest’ultimi in particolare costano circa il doppio del loro prezzo “reale”.
Per quanto concerne la scheda madre, assolutamente degna di nota. Serie H perché non avevo bisogno delle features della Z, ed anche perché in veste di (povero) studente, non posso permettermi nè una mobo di serie Z nè una CPU serie K (con moltiplicatore sbloccato). In ogni caso, bella da vedere, ben costruita ed ottimamente gestita dai software MSI su Windows. Su Hackintosh… si sà, nuovo non sempre significa migliore, specialmente se in pratica stai adattando un OS closed source su hardware non proprietario. Ma alcune patch, e tutto è a posto.
La CPU… DANNAZIONE, se l’ho odiata! Voglio dire, è efficiente energeticamente ed abbastanza prestante, ma il prezzo era un po’ troppo alto per il prodotto IMHO. E come ho detto prima… È stata davvero un’ammazzata farla funzionare su Sierra, fino all’arrivo della nuova serie Mac 2017, assieme ai suoi nuovi modelli Kaby Lake. Ciò rese tutto MOLTO PIÙ SEMPLICE. Infatti, prima dell’update a 10.12.6 (con relativo supporto kernel ai modelli Kaby Lake), per fare funzionare Hackintosh su un Kaby Lake era necessario effettuare uno spoofing di CPU e GPU ID, ed a volte nemmeno questo risolveva molto (come nel mio caso .-.). Far funzionare la GPU con la piena accelerazione è stato un casino, ma alla fine a posto dei fo$!uti 7mb di nvram virtualizzata, sono riuscito a far andare la GPU con tutti i suoi 1536 MB di memoria. E solo dopo, grazie all’update 10.12.6, sono anche riuscito a far funzionare la CPU alla massima potenza.
Le seguenti patches (necessarie su 10.12.5 o antecedente per far funzionare CPU e Grafica Integrata) non sono infatti più necessarie su Sierra 10.12.6 o in ogni versione della nuova versione di Apple macOS, High Sierra! (che fantasia, però…)
1
2
3
4
<key>FakeID</key>
<dict>
	<key>IntelGFX</key>
	<string>0x19168086</string>
1
2
3
4
5
6
7
8
9
10
11
12
13
14
15
<key>Devices</key>
<dict>
	<key>AddProperties</key>
	<array>
		<dict>
			<key>Device</key>
			<string>IntelGFX</string>
			<key>Key</key>
			<string>AAPL,GfxYTile</string>
			<key>Value</key>
			<data>
			AQAAAA==
			</data>
		</dict>
	</array>
Puoi trovare il mio config.plist completo qui.
2. Configurazioni BIOS
Potrebbero variare in base alla scheda madre.
- Step 1: Load Optimised Default
- Step 2: Sulla BIOS Tab Windows 8/10 Features = Other OS Storage Boot Option Control = UEFI
- Step 3: Peripherals Tab Initial Display Output = IGFX XHCI Handoff = Enabled (In USB Configuration)
- Step 4: Chipset Tab VT-D = Disabled Internal Graphics = Enabled DVMT Pre-Allocated = 64M
- Step 5: Save and Exit
3. Cosa scaricare
Hai bisogno di scaricare diversi file per funzionare tutto. Questi file sono necessari durante tutta la sessione di installazione di Mac OS.
3.1. Bootloader
L’ultima versione di Clover Bootloader. Questo Bootloader permette di avviare sia MacOS, che Windows e distro Linux, tutte in uno e con una interfaccia altamente personalizzabile.
3.2. Utilità
Sono apps o scripts che ti aiuteranno durante l’inizializzazione, installazione e configurazione di Hackintosh. Scarica le ultime versione in base alla tua versione di macOS
- Clover Configurator. Se dovessi riscontrare il bug dei 7mb usa la versione Classic a posto della Vibrant. Quest’app ti permette di configurare le tue impostazioni bootloader tramite un’accattivamente UI, invece che tramite riga di comando (disponibile pure)
- UniBeast, MultiBeast and KextBeast. Queste apps ti permettono rispettivamente di creare una USB avviabile, configurare la tua Hackintosh machine ed installare alcuni drivers primari in post-installazione
- audio_cloverHDMI-130.command di Toleda. Questo script permette in pochi click di abilitare l’audio onboard della HD630.
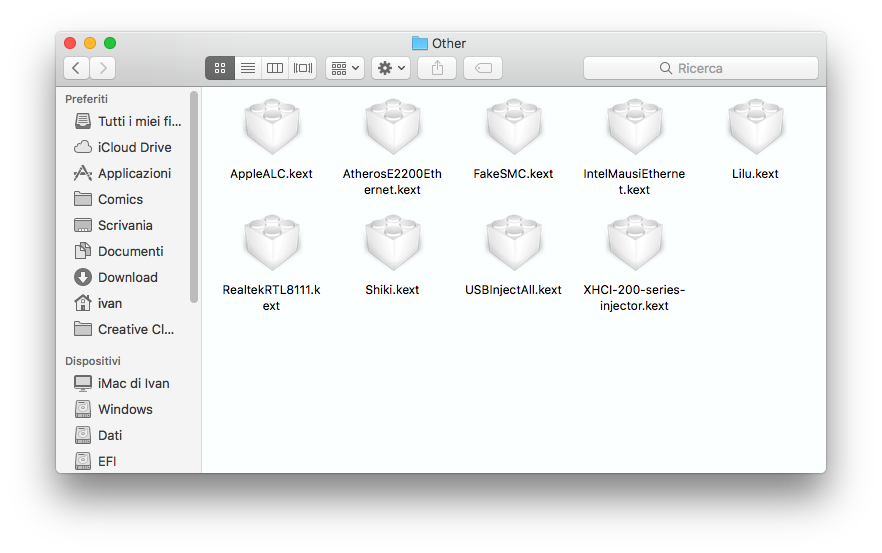
3.3. Kexts
I kexts sono praticamente drivers, che permettono di usare le varie periferiche nel modo più plug&play possibile.
- AppleALC.kext di vit9696 - repo Github qui
- Lilu.kext di vit9696 - repo Github qui
- Shiki.kext di vit9696 - repo Github qui
- XHCI-200-series-injector.kext di RehabMan - repo Github qui
- USBInjectAll.kext di RehabMan - repo Bitbucket qui
Altri kexts di cui avrai bisogno in seguito: (in post installazione, tramite MultiBeast)
- AtherosE2200Ethernet.kext
- FakeSMC.kext
- IntelMausiEthernet.kext
- RealtekRTL8111.kext
4. Installazione
4.1. Prerequisiti
- Una Mobo Serie 200 con Processore Intel di 7a Generazione (KabyLake)
- Un Mac, Hackintosh o Macchina Virtuale funzionante (sebbene le VM non siano raccomandate) - senza uno di questi non puoi proseguire.
- Una chiavetta USB da 16GB o più (alcuni riportano di essere riusciti a far funzionare il tutto con una da 8GB, sebbene non sia il mio caso)
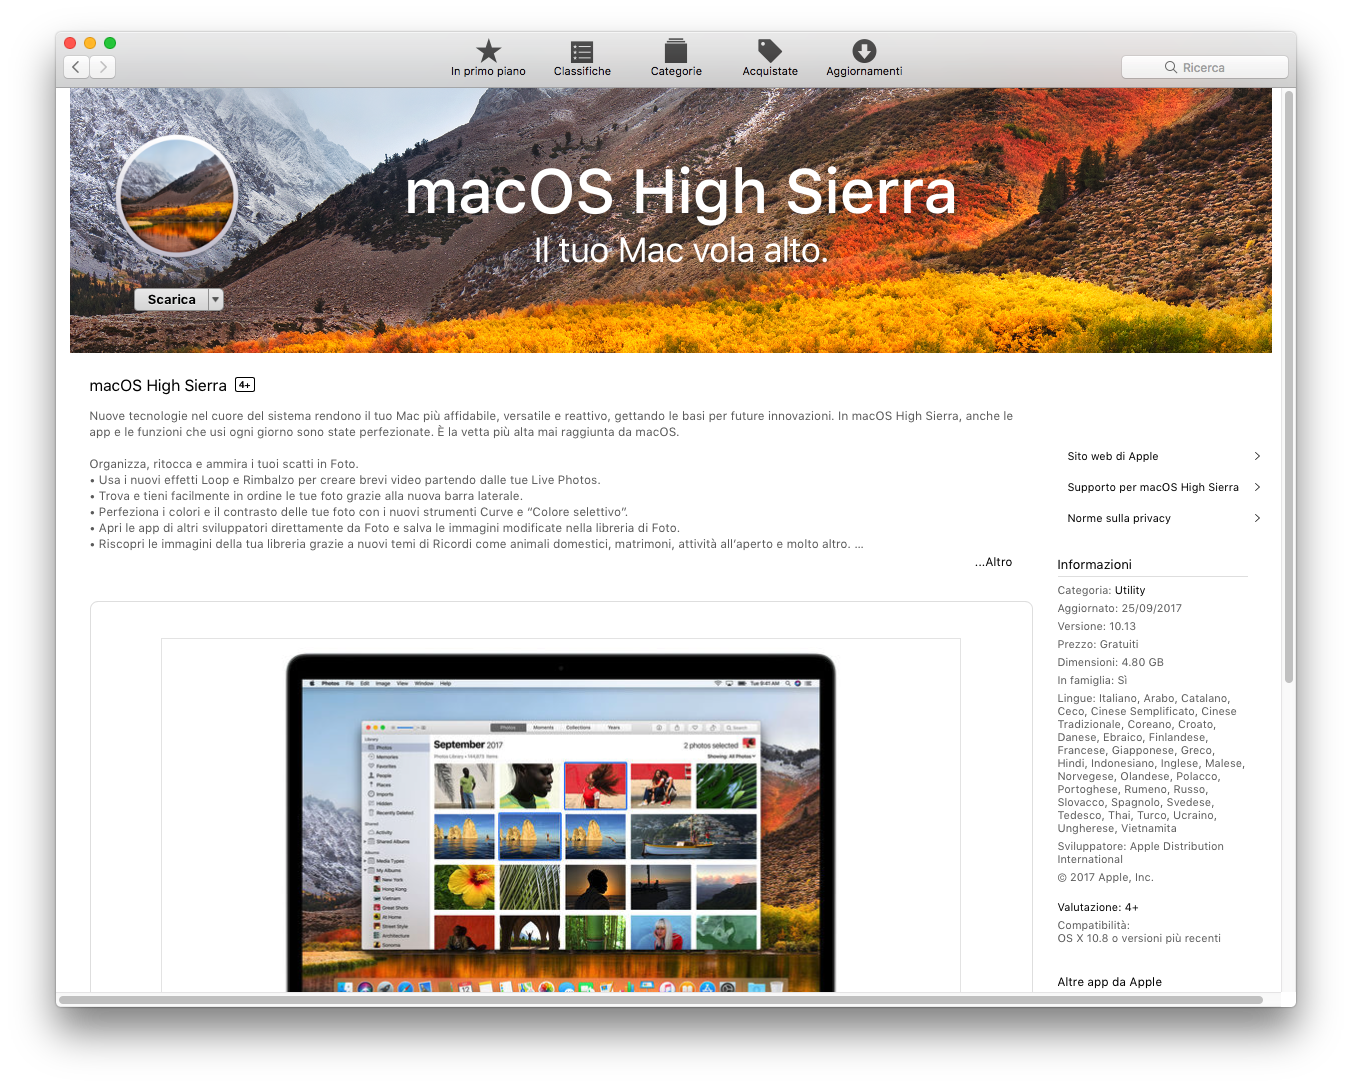
4.2. Scaricare macOS
- Sul tuo Mac, Hackintosh o VM apri il Mac App Store
- Accedi con il tuo Apple ID
- Scarica macOS Sierra (10.12.6) o High Sierra - questa guida è basata su 10.12.6, ma potrebbe essere applicabile anche su High Sierra con qualche dovuta modifica
- Al termine del download il setup dovrebbe avviarsi e dovresti premere Esci tramite tasto destro sull’icona del Dock. Puoi trovare l’app del setup in /Applicazioni/Install MacOS Sierra.app
4.3. Preparare la USB
Se la seguente guida non funziona nel tuo caso prova invece con questa
- Apri Utility Disco –> Seleziona la USB ed Inizializzala usando Mac OS esteso (journaled) –> Mappa partizione GUID –> Inizializza
- Ora apri Unibeast –> Scegli la USB –> Quindi seleziona UEFI –> Dopodichè seleziona Sierra
- Apri la partizione EFI della USB –> EFI/Clover –> Apri il config.plist tramite Clover Configurator
- Esegui le modifiche necessarie (nessuna nel mio caso)
Nel caso tua abbia un build molto simile alla mia, rinomina l’esistente conf.plist in orig-config.plist ed incollagli il mio.
Sposta TUTTI i file scaricati nella USB, crea una cartella ed incollali lì.
4.4. Tweak porte USB
Non necessario se usi il mio config.plist
Dopo aver creato la USB avviaibile, dovresti effettuare qualche tweak sulle porte USB nel caso in cui la tua mobo abbia porte USB 3.0+. Se hai solo porte USB 2.0, allora gli step successivi non sono necessari, ma ti raccomando di seguirli lo stesso
Aggiungi queste configurazioni nel config.plist tramite Clover Configurator. (Patches già applicate nel mio config.plist)
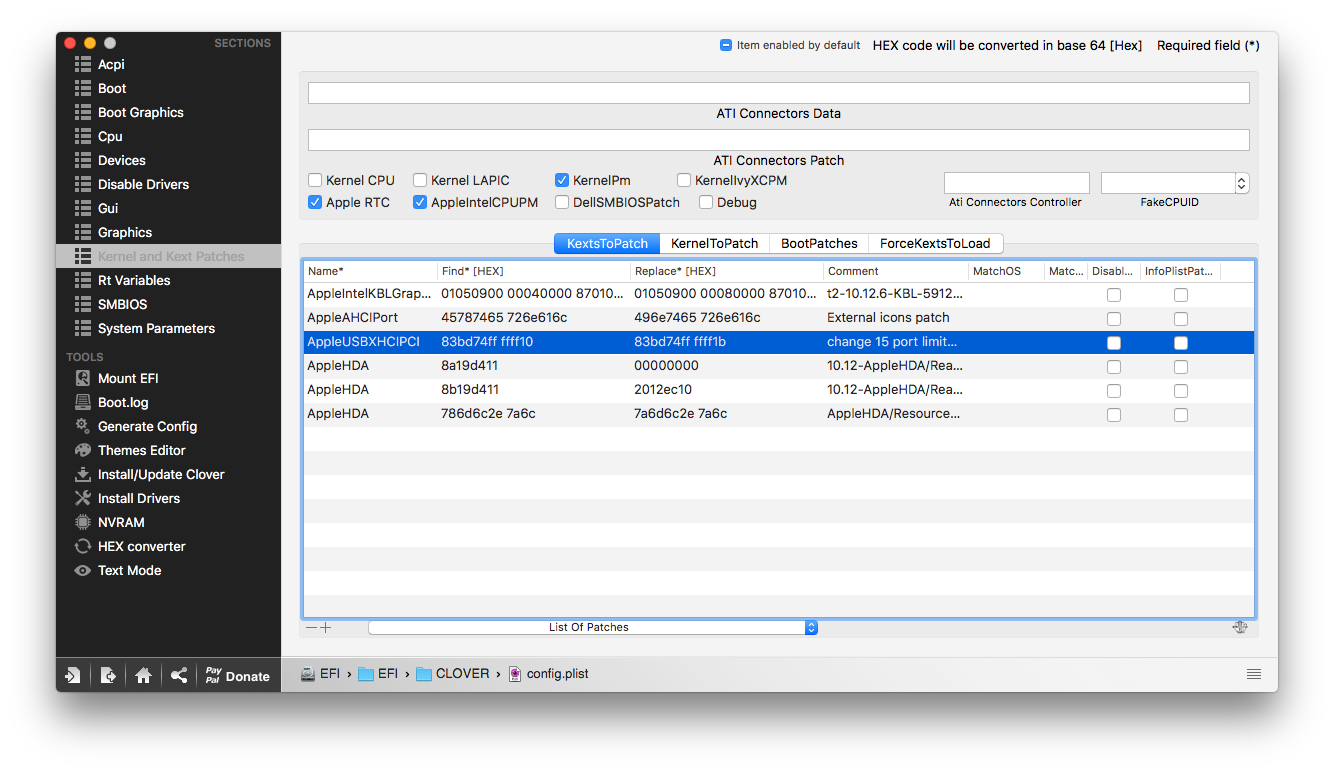
Incrementare il limite delle porte
Kernel and Kext Patches –> KextToPatch –> +
1
2
3
4
Name: AppleUSBXHCIPCI
Find: 83bd74ff ffff10
Replace: 83bd74ff ffff1b
Comment: Increase port limit

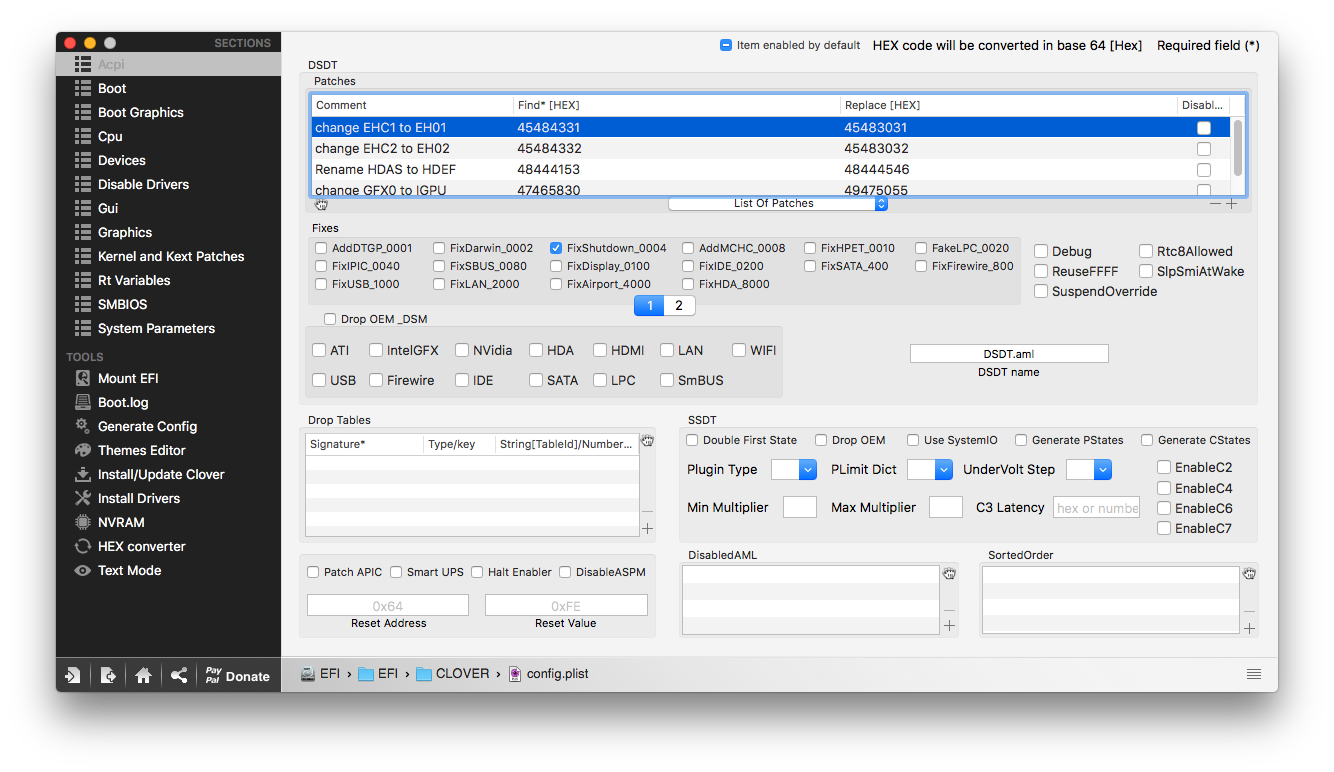
Rinominare EHC a EH0
ACPI –> DSDT –> Patches –> +
Queste due patches permettono allo USBInjectAll.kext di essere caricato:
1
2
3
Comment: change EHC1 to EH01
Find: 45484331
Replace: 45483031
1
2
3
Comment: change EHC2 to EH02
Find: 45484332
Replace: 45483032
Sposta USBInjectAll.kext e XHCI-200-series-injector.kext nella partizione EFI della USB, in /EFI/Clover/kexts/Other.
4.5. Installazione MacOS Sierra
- Spegni il computer
- Premi l’hotkey Canc per scegliere il disco di avvio (potrebbe differire in base alla scheda madre)
- Seleziona la USB
- Alla schermata di Clover, seleziona Boot Mac OS X from USB
- Arrivato all’Installer, scegli la lingua.
- Nella barra in alto seleziona Utilità e quindi Utility Disco
- Evidenzia il tuo disco scelto per l’installazione di Sierra tramite la colonna a sinistra.
- Premi il tasto Inizializza
- Nome: scrivi Sierra (puoi rinominarlo in seguito)
- Formato: segli Mac OS esteso (journaled)
- Schema: Scegli Mappa partizione GUID
- Seleziona Inizializza
- Chiudi Utility Disco
- Evidenzia la tua partizione di installazione per Sierra e clicca Continua.
- Dopo il primo riavvio premi nuovamente l’hotkey Canc per scegliere il disco di avvio
- Seleziona la USB
- Alla schermata di Clover, scegli Boot MacOS from the HDD dove lo hai installato.
Se non sai come installare MacOS segui la Installation Guide
5. Post-Installazione
Dopo un’installazione riuscita, hai bisogno di installare i kexts e le patches necessarie per far funzionare il tutto. In poche parole è la stessa cosa che avviene subito dopo l’installazione di Windows, ma leggermente diversa. Su Windows, i drivers sono contenuti in pacchetti installabili tramite pochi click, mentre in macOS dovremmo installarli manualmente passo passo. Come ho detto prima, a seguito del rilascio di macOS 10.12.6 tutto è diventato più semplice a seguito del supporto nativo dei processori Kabylake. Inoltre, tonymacx86 ha rilasciato una nuova versione di MultiBeast, con il supporto alla Serie 200 con processori Kabylake di 7a generazione. Immagina questi steps avresti dovuto seguire prima…
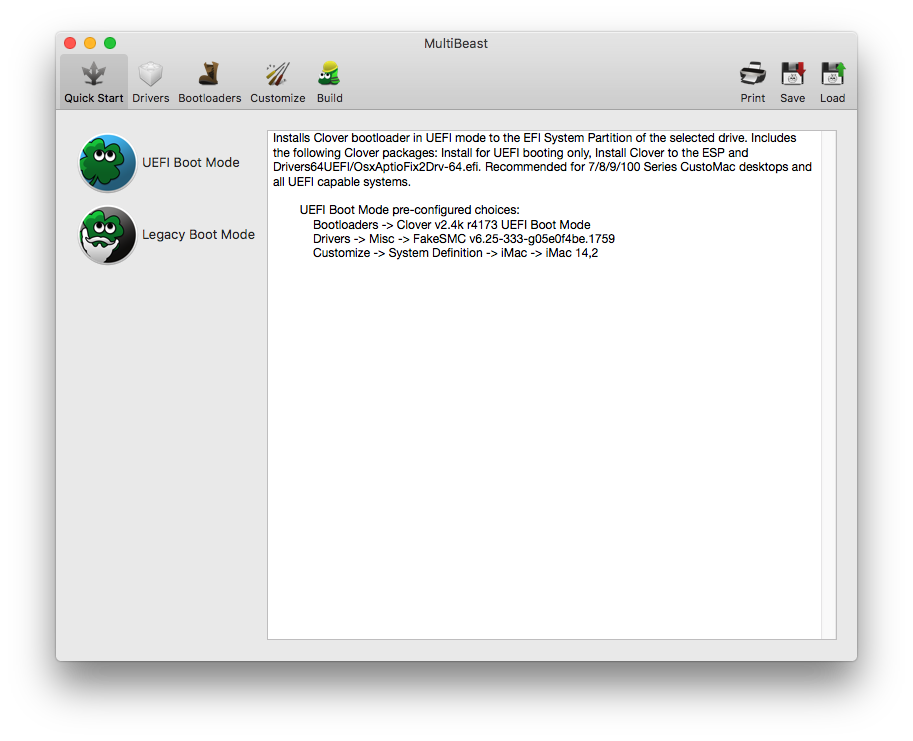
5.1. Post Installazione con MultiBeast
- 1° Step = Copia tutti i file scaricati sulla Scrivania.
-
2° Step = Apri Multibeast –> Quick Start –> UEFI Boot Mode
- 3° Step = Drivers –> Audio –> Seleziona sia ALC1220 che 100/200 Series Audio. (Io ho abilitato anche l’Output a 5.1 canali, dato che lo ho integrato)
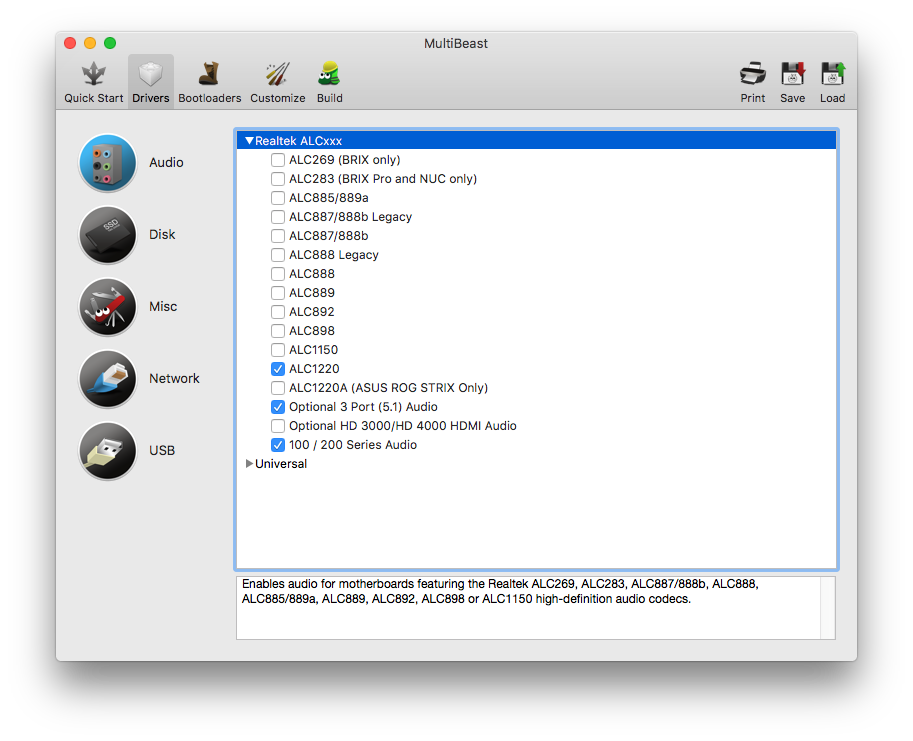
Se hai un codec audio diverso seleziona quello che ti interessa. La versione del codec è specificata tra le componenti della scheda madre
Ci sono due modi per far funzionare l’audio. Questo è il primo. Se nel tuo caso non funziona prova il secondo nella sezione “Post Installazione con Clover Configurator/Audio”.
-
4° Step = Drivers –> Network –> Seleziona IntelMausiEthernet v2.3 (Io ho installato anche il RealtekRTL8111 v2.2.1)

-
5° Step = Drivers –> USB –> Seleziona Increase Max Port Limit 200 Series
-
6° Step = Bootloader –> Seleziona Clover + Emulated NVRAM
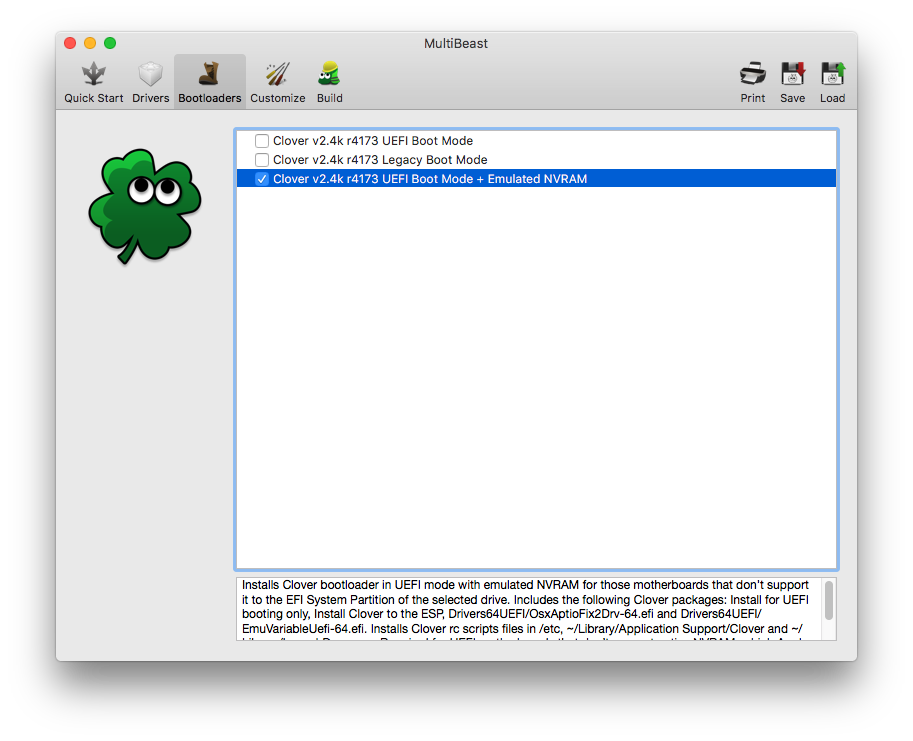
Nota: Dopo aver terminato con Multibeast non dimenticare di aggiornare Clover Bootloader all’ultima versione. Puoi farlo tramite l’app Clover Configurator o tramite il link sopra.
-
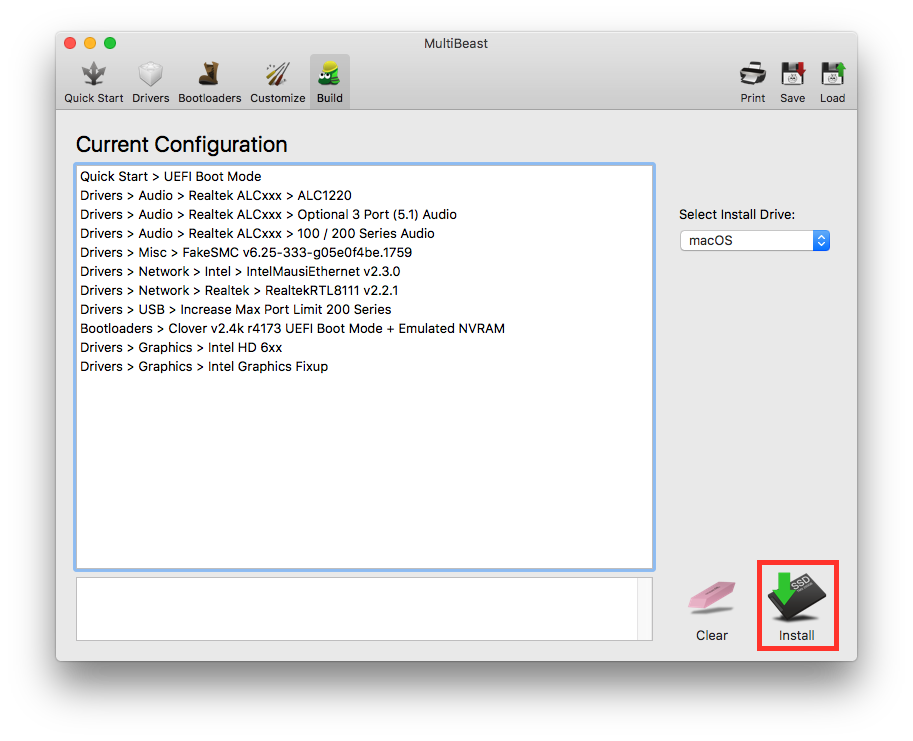
7° Step = Customize –> Graphics Configuration –> Seleziona Intel HD 6xx

-
8° Step = Final Build Configuration Build –> Install
5.2. Post Installazione con Clover Configurator
Non necessario se usi il mio config.plist
5.2.1. Configurazione Base
- Apri Clover Configurator, quindi monta la Partizione EFI se non lo è già (Multibeast dovrebbe montarla automaticamente)
-
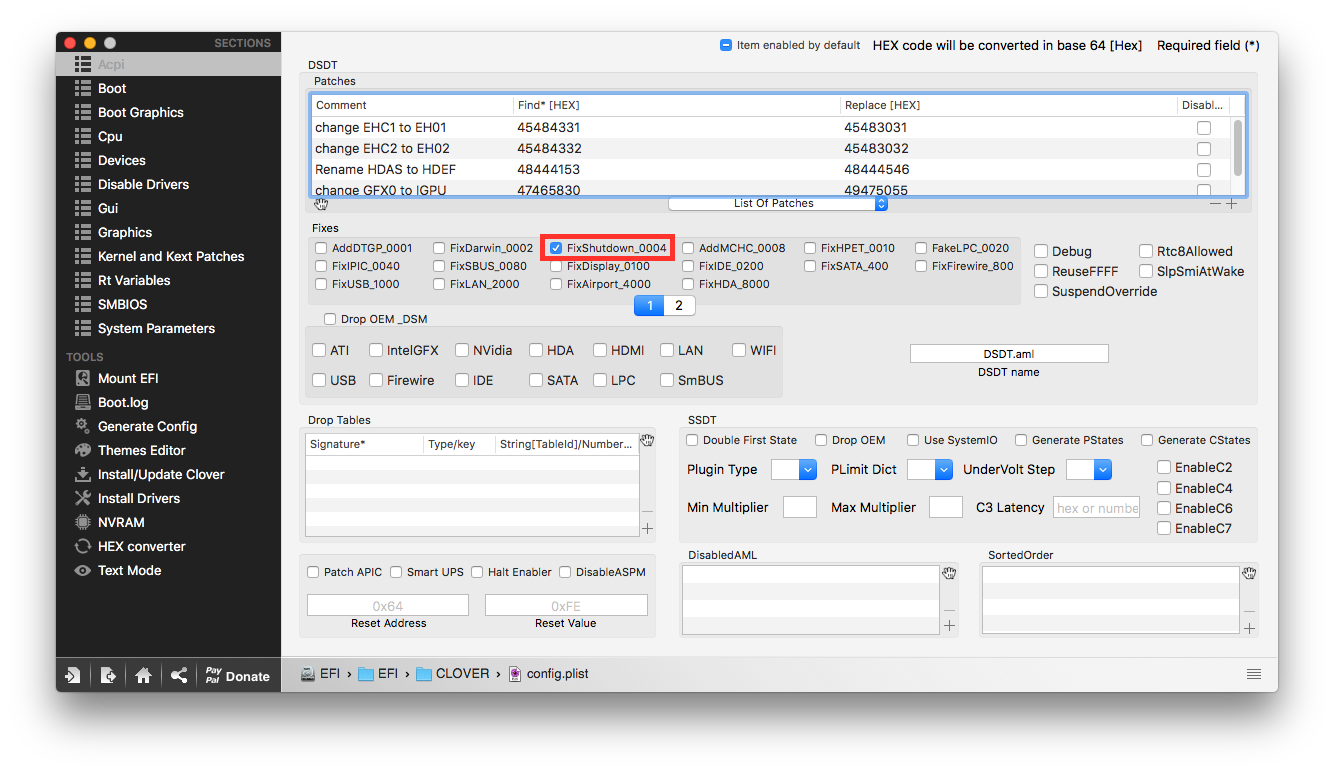
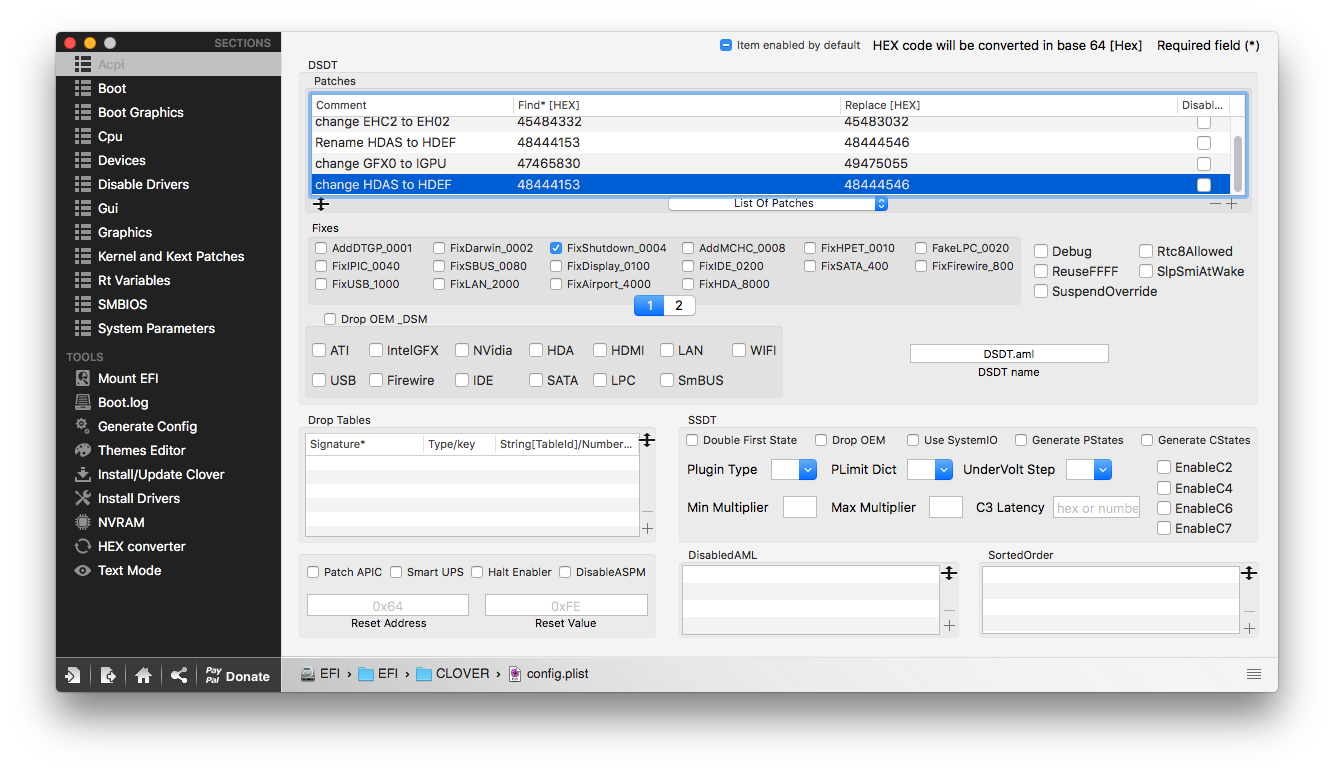
Risolvi il bug del riavvio casuale in fase di spegnimento tramite la spunta FixShutdown_0004 sotto ACPI –> Fixes
- XMPDetection=Yes (Se la tua RAM ha un clock maggiore di 2133MHz, come nel mio caso)
Non chiudere Clover Configurator. Aggiungi tutte le entries dai passi sotto prima o dovrai riaprire Clover Configurator ad ogni step.
5.2.2. HD Graphics 630 con QuickSync & Contentuti iTunes DRM
Apri Clover Configurator se non aperto.
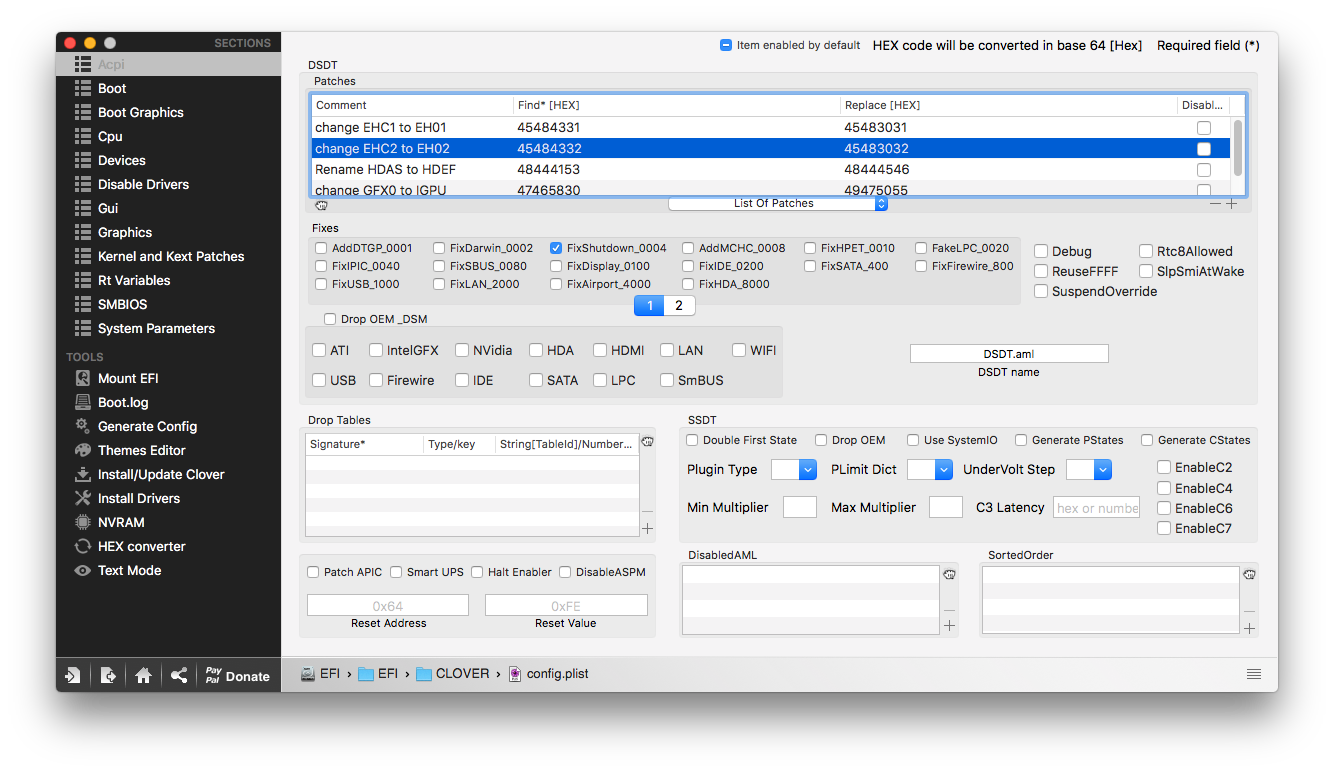
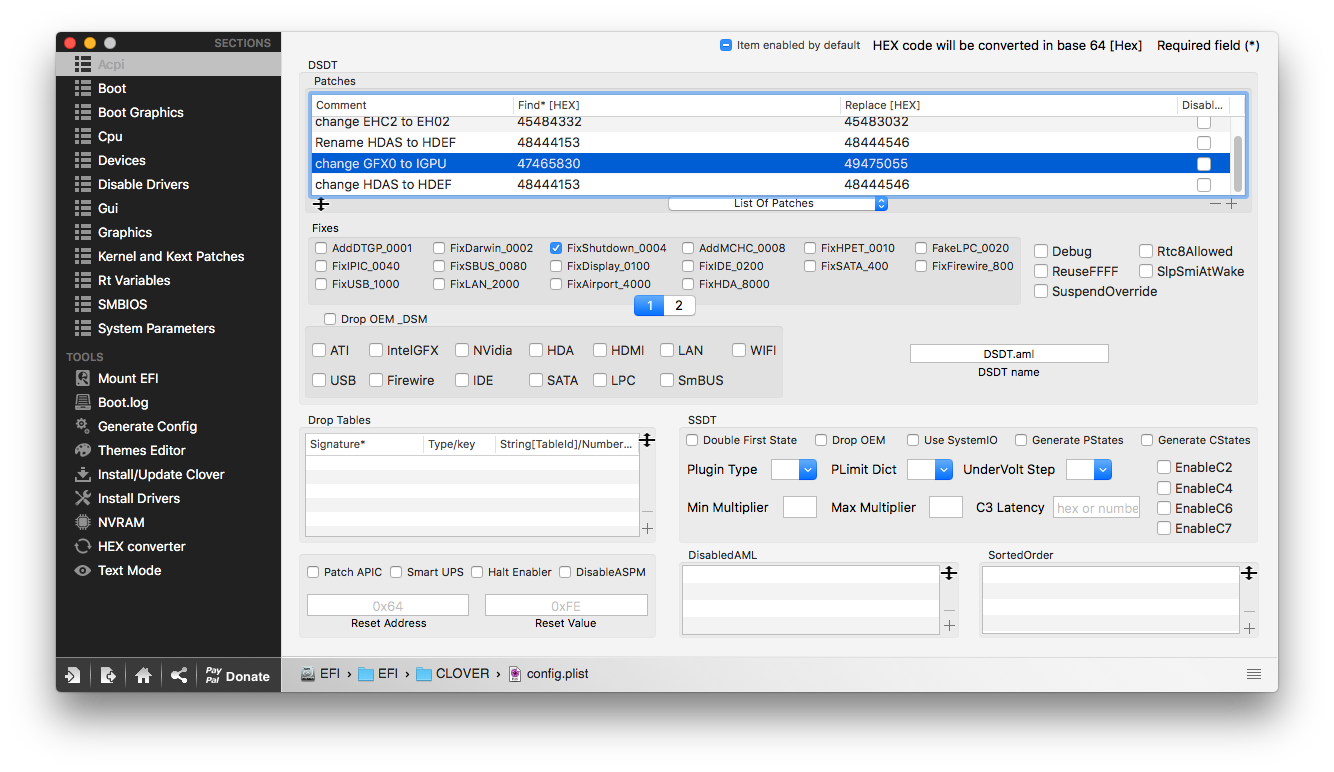
Aggiungi patches in DSDT
ACPI –> DSDT –> Patches –> +
1
2
3
Comment: change GFX0 to IGPU
Find: 47465830
Replace: 49475055
-
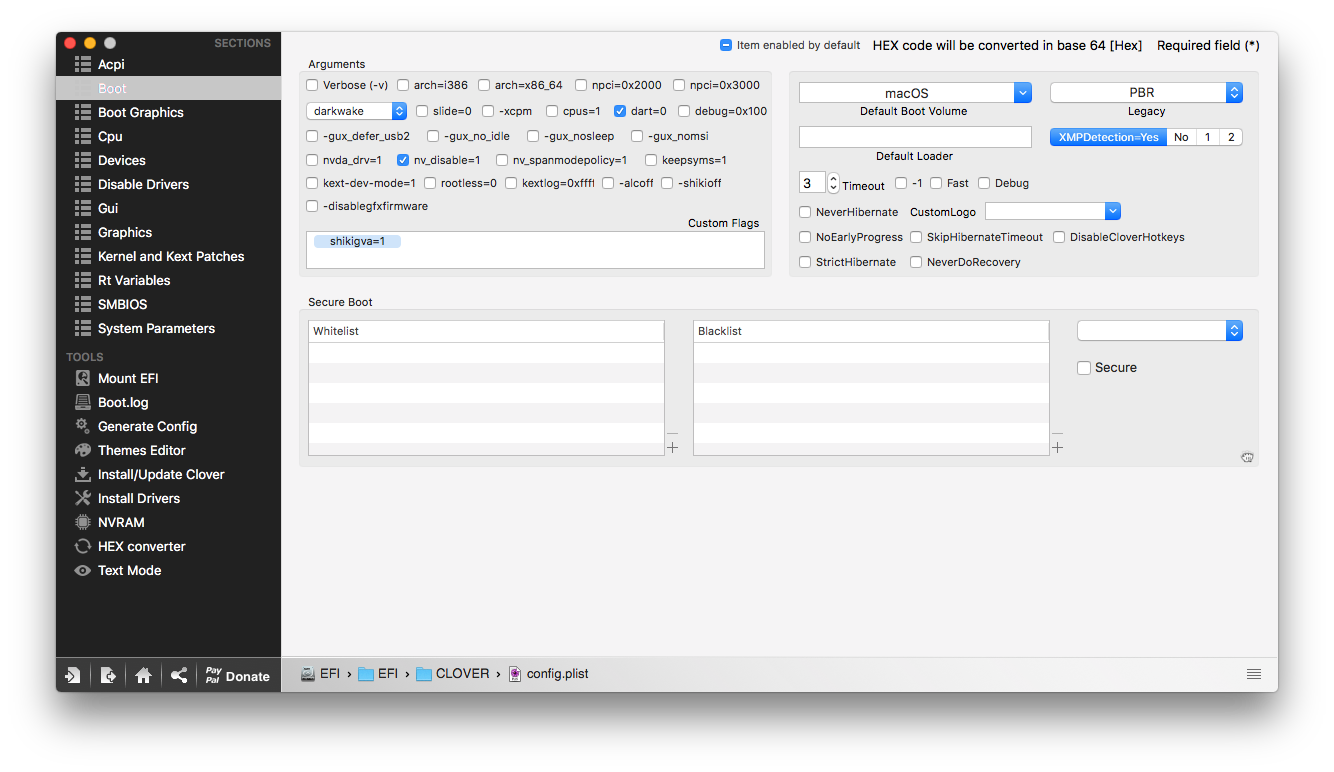
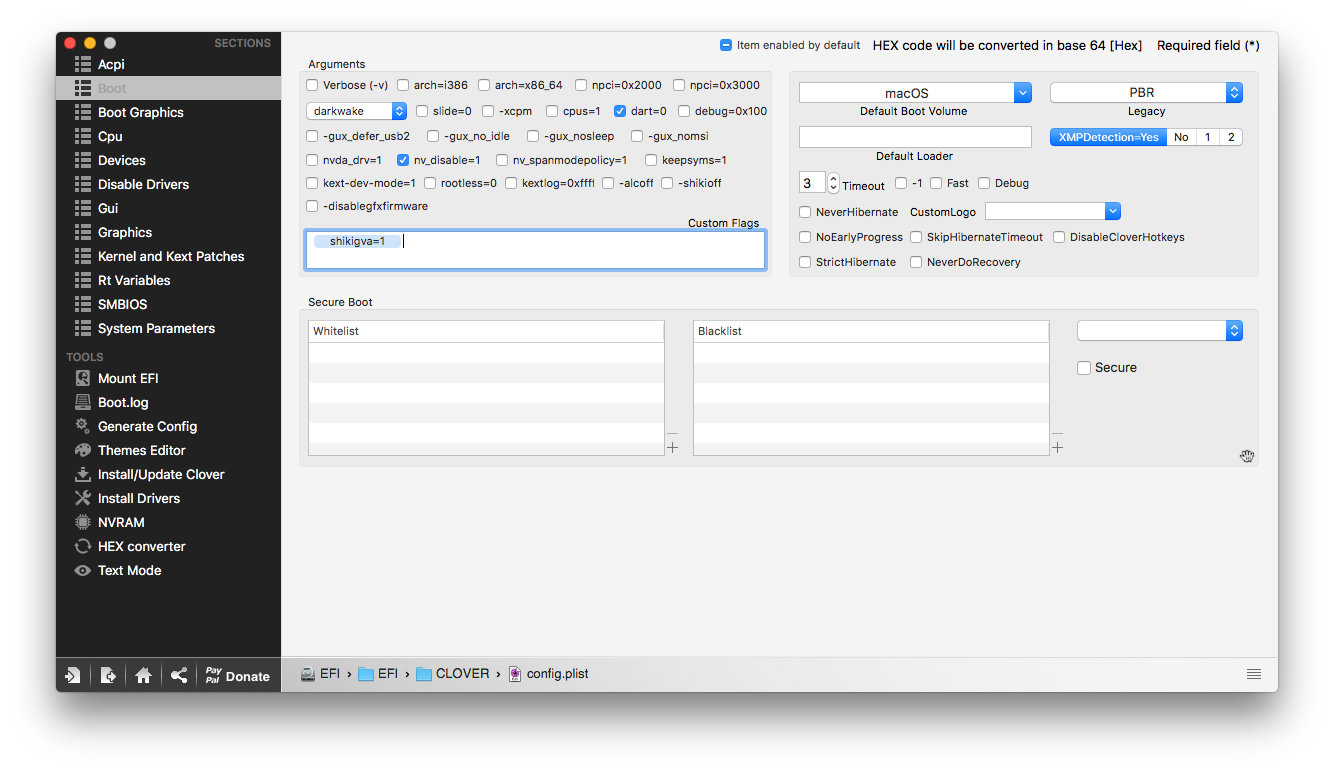
Aggiungi la bootflag shikigva=1 in Boot –> Custom Flags
-
Copia Shiki.kext e AppleALC.kext ed incollali in EFI drive/EFI/Clover/kexts/Other.
5.2.3. Secondo Metodo Audio
Apri Clover Configurator se non aperto.
- Assicurati che Lilu.kext e AppleALC.kext (se hai appena seguito gli step precedenti AppleALC dovrebbe già trovarsi in kexts/Other) siano installati. In caso contrario installali.
- Aggiungi patches in Clover Configurator
Aggiungi patches in DSDT se non presente.
ACPI –> DSDT –> Patches –> +
1
2
3
Comment: change HDAS to HDEF
Find: 48444153
Replace: 48444546
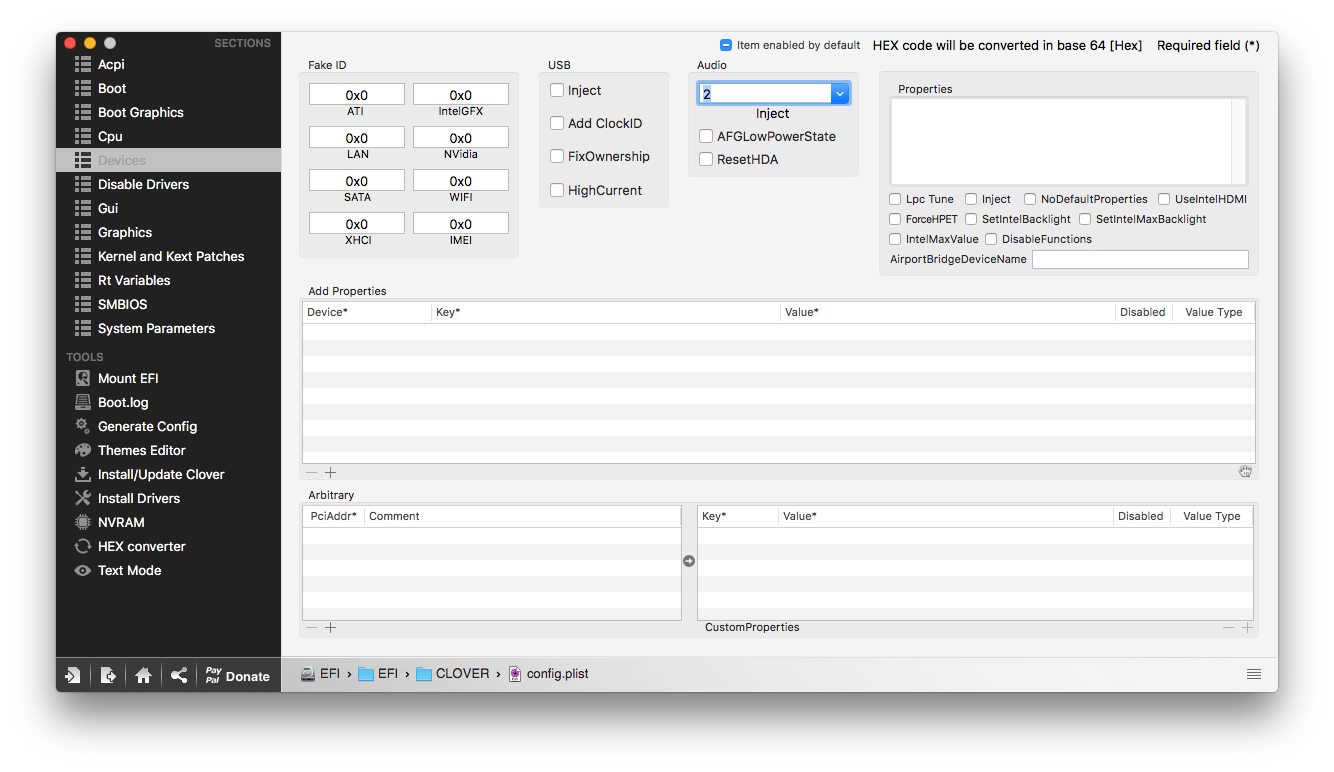
Cambia l’Audio ID a 1 o 2 se non diverso.
Nell’ultima versione di AppleALC.kext, gli audio ID 1, 2 o 11 sono pienamente supportati dai codecs ALC1220 e ALC1220A.
Devices –> Audio –> Cambialo in 1 o 2 o 11
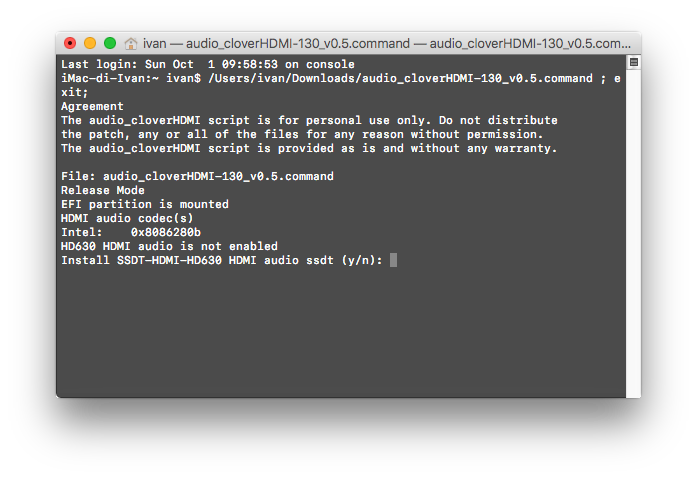
Esegui audio_cloverHDMI-130.command in modo da far funzionare l’HDMI Audio se lo necessiti. Se questo metodo non funziona segui la [guida di Toleda sull’HDMI Audio](https://www.tonymacx86.com/threads/quick-fix-200-series-kaby-lake-audio-onboard-and-or-hd-6x0-hdmi.221618/.
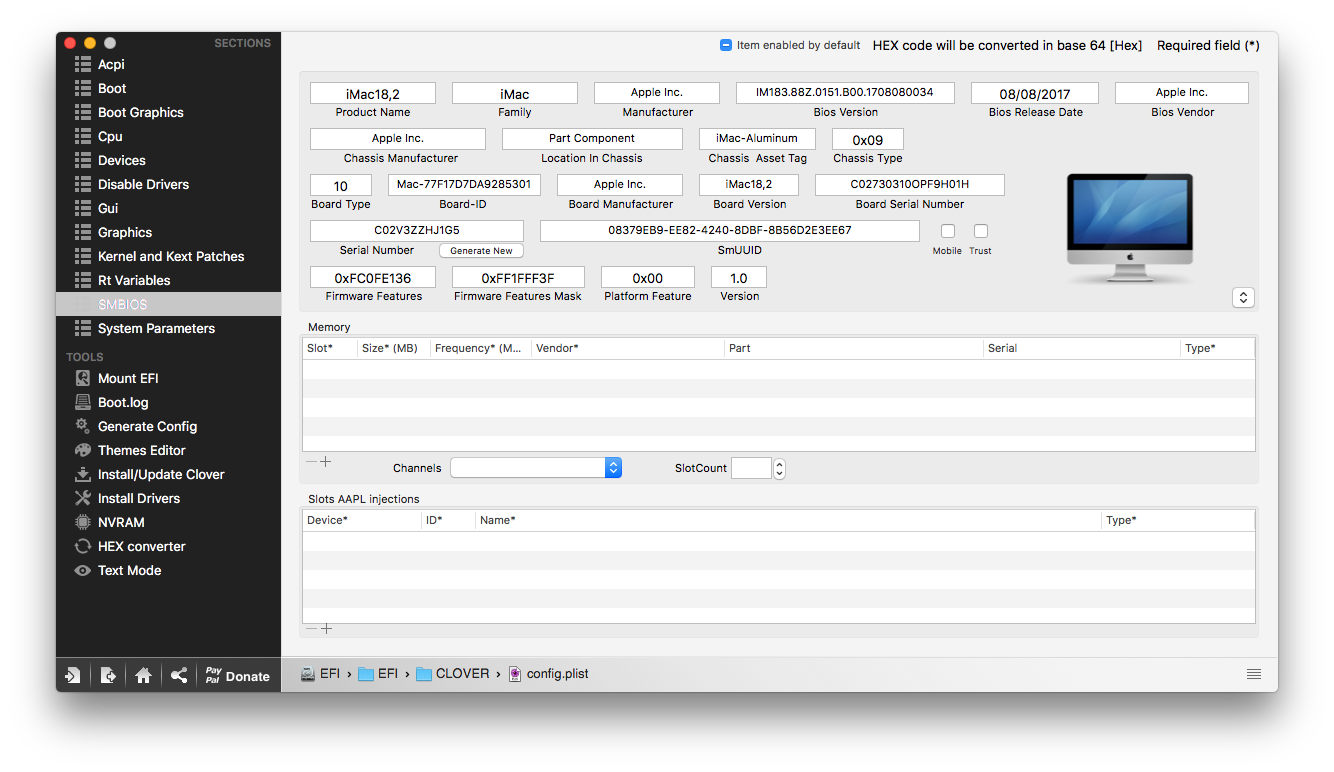
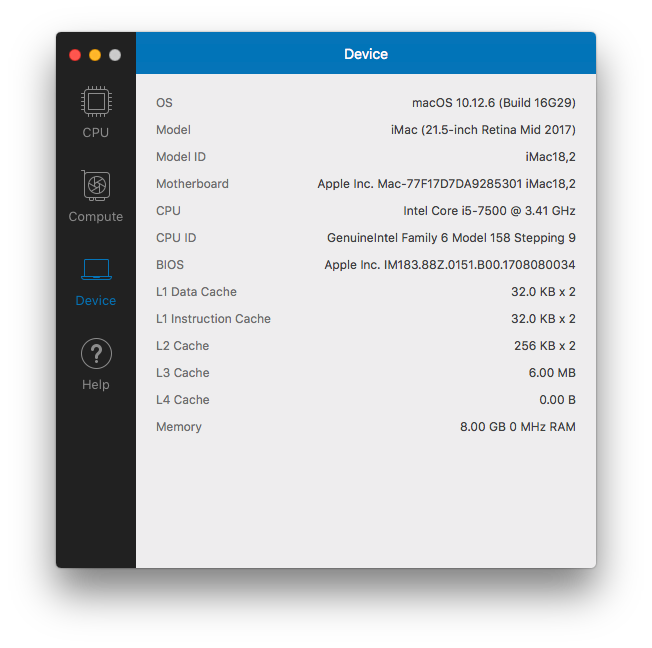
5.3. SMBIOS
Abbiamo bisogno di cambiare il nostro SMBIOS ad iMac 18.1 o 18.2 o 18.3 poiché questi sono gli SMBIOS dei nuovi Mac Kabylake. Questo step è necessario perché senza il giusto SMBIOS il sistema non si avvierà e peccherà di alcune funzioni come la gestione energetica, iMessage, l’accelerazione grafica ecc.
Per la perfetta configurazione SMBIOS dai un’occhiata a questo link e segli l’SMBIOS che più si addice al tuo processore.
Nel mio caso, ho cambiato il mio SMBIOS a 18.2 (perché è l’SMBIOS del Mac con i5-7500).
5.4. Gestione Energetica USB
Per chi voglia implementare correttamente la gestione energetica segua la guida alla corretta injection per la USB Power Management su Sierra (o successivo).
Inoltre, non dimenticare l’aggiunta delle seguentu patches in Kernel and Kext Patches –> Kext To Patch
1
2
3
4
Name: com.apple.driver.usb.AppleUSBXHCIPCI
Find: 83bd74ff ffff10
Replace: 83bd74ff ffff1b
Comment: change 15 port limit to 26 in XHCI kext (100-series)
1
2
3
4
Name: AppleUSBXHCIPCI
Find: 837d8c10
Replace: 837d8c1b
Comment: Change 15 port limit to 24 in XHCI kext
Come potresti aver notato non ho applicato la prima patch, perché non ne avevo bisogno.
5.5. iMessage
An iDiot’s Guide To iMessage è la migliore guida al corretto funzionamento di iMessage che possiamo trovare su internet, segui solo ogni indicazione passo passo.
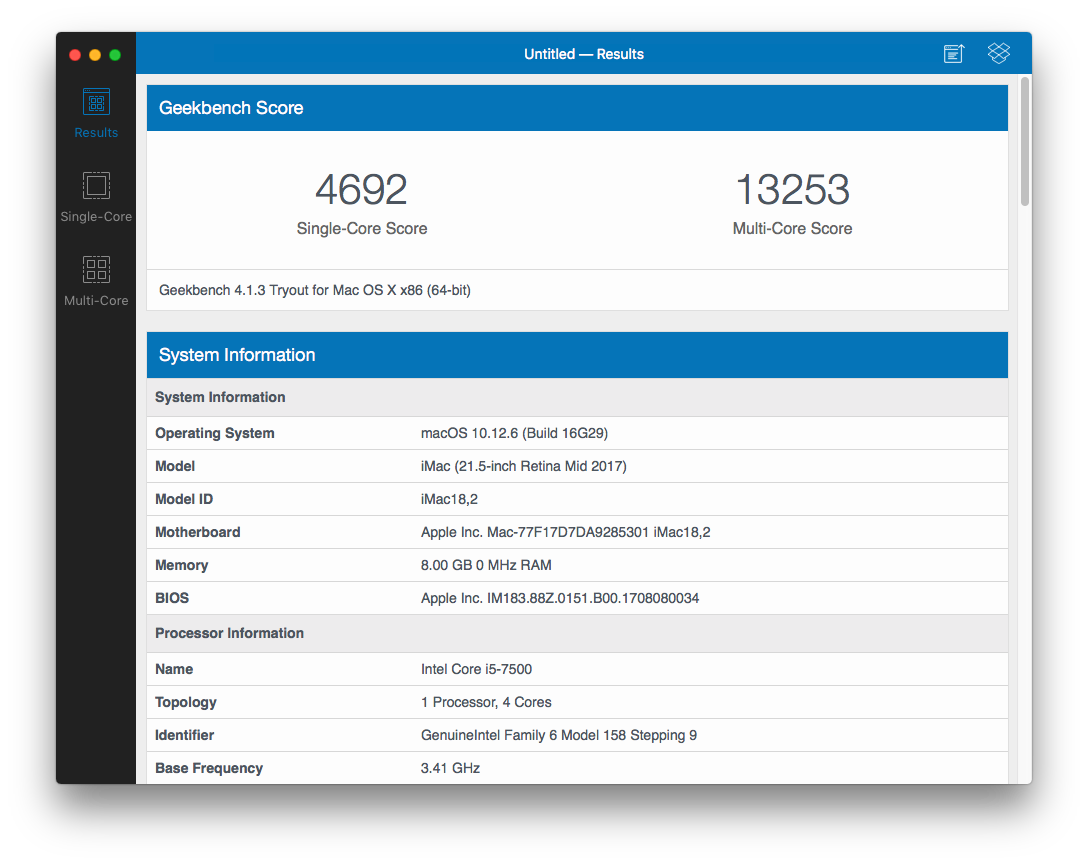
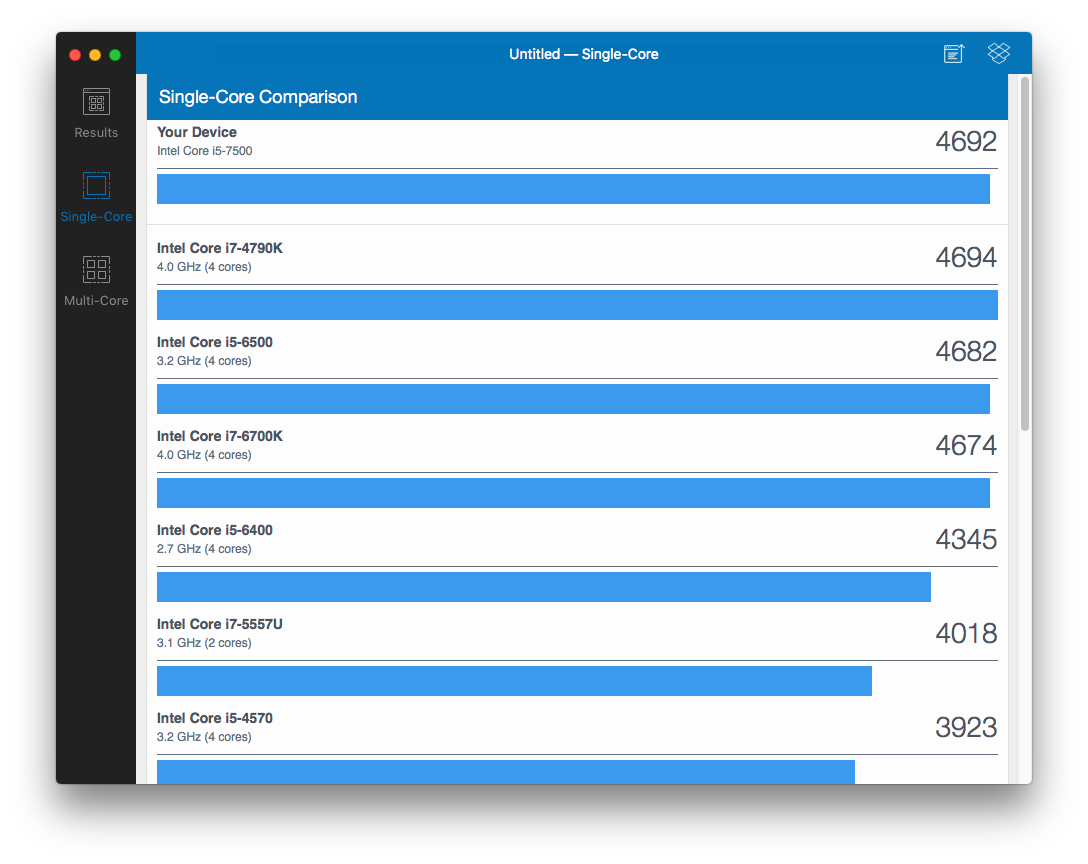
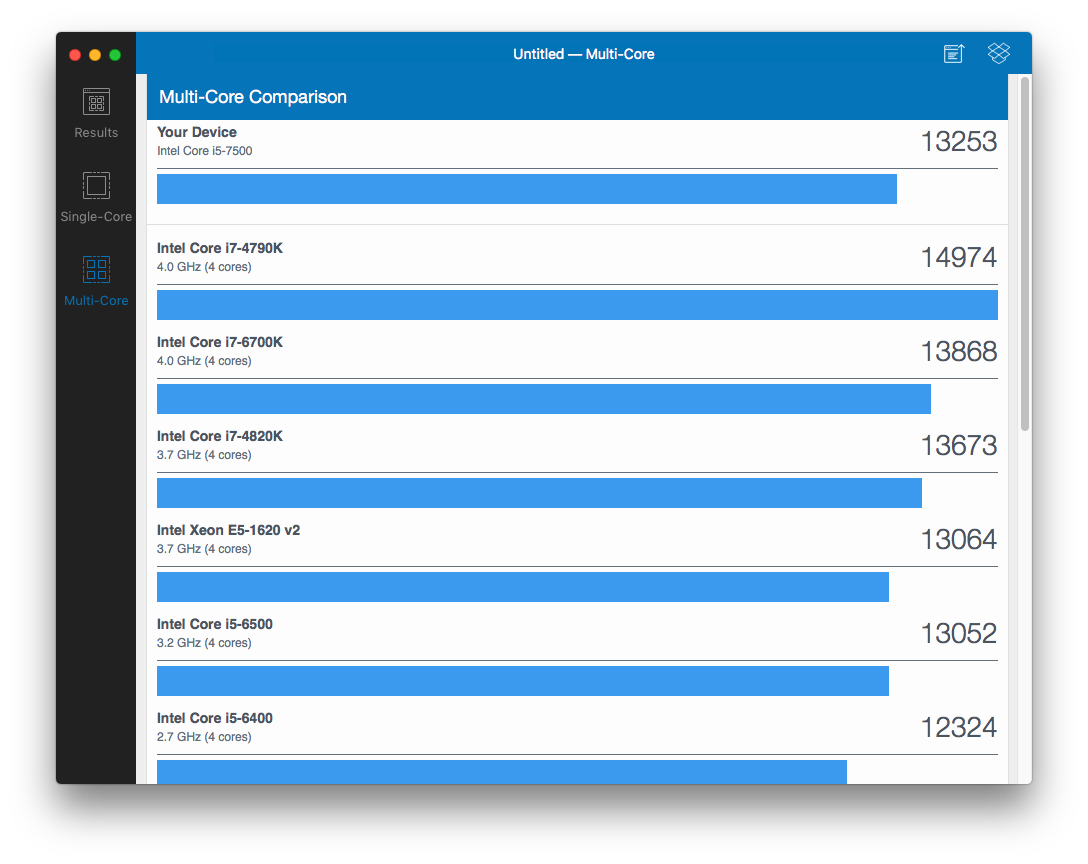
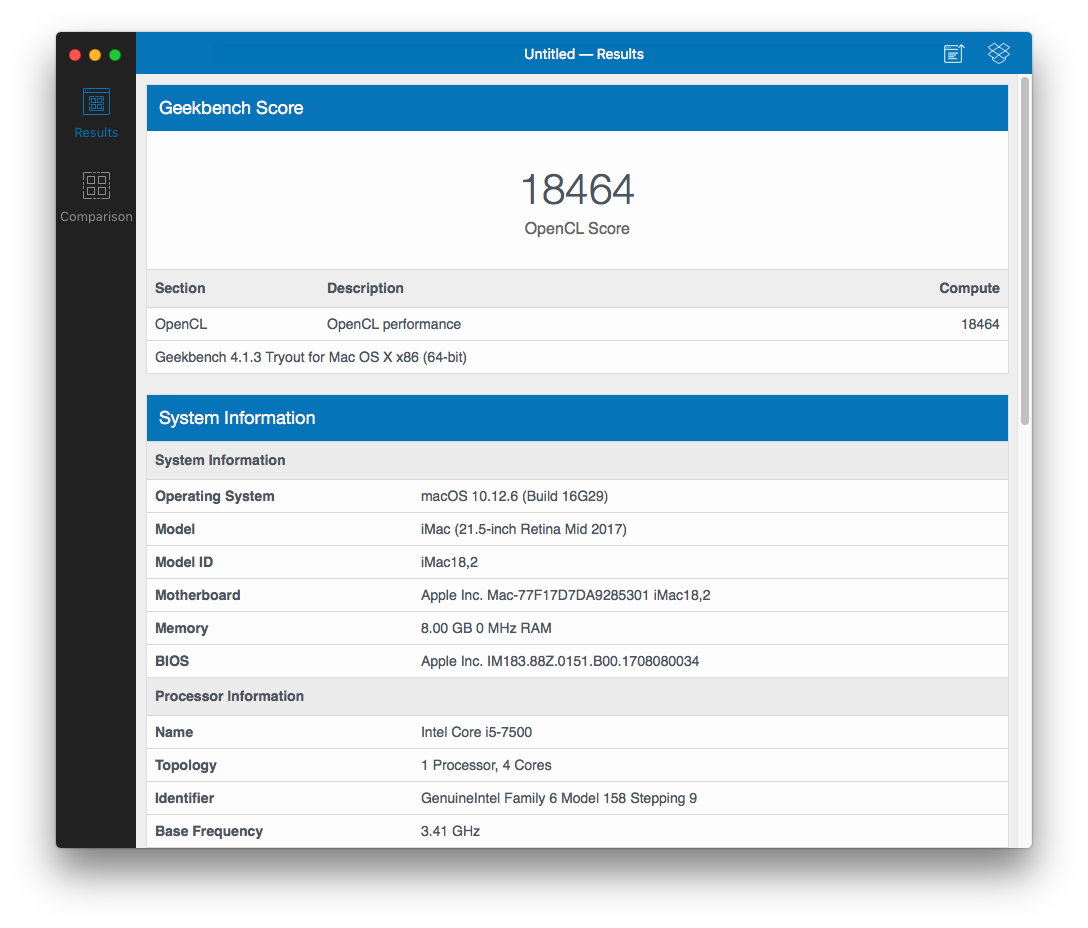
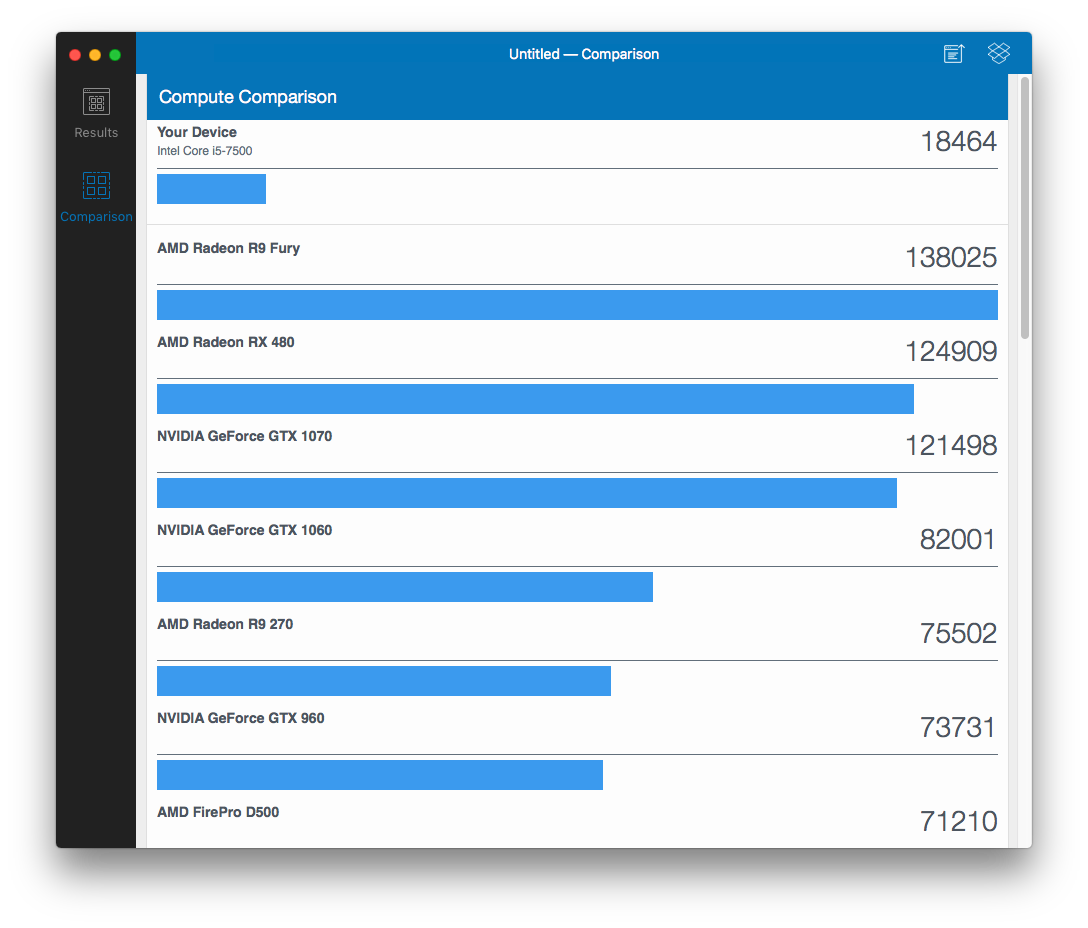
6. Punteggi Geekbench
I risultati sono davvero buoni, considerato il fatto che stiamo parlando di un un OS in esecuzione su hardware non nativamente supportato.
7. Domande Frequenti
- Domanda: Dopo l’installazione di macOS questo non si avvia dall’HHD, ma solo dalla USB! Risposta: In questo caso devi prima di tutto avviare appunto da USB. Una volta arrivato alla Scrivania copia l’intera cartella EFI dalla USB sul tuo Hackintosh. Quindi rimpiazza quella già presente nella partizione EFI dell’HHD con quella appena copiata.
- Domanda: Come abilitare le schede video NVIDIA? Risposta: Adesso NVIDIA rilascia anche i nuovi Web Driver per GPU con architettura Pascal. Per farle funzionare scarica lo NVIDIA FixUP o semplicemente seleziona l’opzione NVIDIA Web dal nuovo Multibeast.
- Domanda: Questa guida può essere applicata anche ad altre schede madre? Risposta: Sì, potrebbe, ma devi adottare i necessari cambiamenti (kexts, config.plist, bootflags…) in post-installazione ed essere sicuro che le opzioni BIOS siano compatibili con l’avvio di Hackintosh.
8. Aggiornamenti?
Apple rilascia in media un aggiornamento ogni uno o due mesi. Dopo aver seguito tutti gli step precedenti, potresti aggiornare facilmente tramite il Mac App Store. Ma a volte qualcosa può andare storto. Per questo ti raccomando di mantenere sempre una copia della tua cartella EFI e dei tuoi file più importanti in una partizione/disco a parte. Comunque se qualcosa del genere dovesse succedere scrivimi nei commenti sotto o alla mia mail, nella sezione About.
Problemi Grafici? Dopo l’aggiornamento se non riesci più ad avviare prova disabilitando Inject Intel da Boot/Options/Graphics Injector/Untick inject-intel. Una volta raggiunta la Scrivania, installa Lilu.kext e IntelGraphicsFixup.kext in Library/Extension. Se questo non ti aiuta ancora segui la relativa sezione nella guida sovrastante. Se tutti i kexts necessari sono già installati, però, non dovresti avre alcun problema ad aggiornare.
Assicurati che l’audio funzioni perché il secondo metodo potrebbe essere affetto da eventuali aggiornamenti. Se hai problemi audio, segui nuovamente i relativi step nella guida sopra.
9. Ringraziamenti
- jktaurus8 per la sua fantastica guida.
- RehabMan
- GhostHitWall
- tonymacx86
- onmybikedrunk
- toleda
- P1LGRIM
- Te, se hai letto l’intera guida. In caso contrario… beh… fanghule.
It wasn’t very easy to accomplish, but dang! An Hackintosh (almost) completely working!
The process is not reccomended for noobs (although I am one myself), unless you really want to spend a lot of time to even try to make it boot, but I ensure you that the overall result will be worth the hours of headache you’ll get later!
1. My build
So let’s start with my build. I assembled it something like 7 months ago, and it costed me around €500. Now it could cost like 100 euro less, but I’m pretty happy for the result I got with those money anyway.
My entire setup has been built with:
- an MSI H270 Gaming M3, a 200 serie mobo, with a bunch of red LEDs and an overall fancy aestetich. Worth the €126 I spent, now at €116*.
- an Intel Core i5-7500, a 3.4Ghz with 6Mb of cache Kaby Lake. Bought at €211, now at €184*
- a Western Digital Blue 1 Tb @ 7200RPM HDD. Really solid. Very nice product for the 51 euro I spent for it* (price it has kept).
- a single slot of Ballistix Sport LT RAM. 8 Gb DDR4 at 2400Mhz clock. A nice deal for €54, considering now it costs more than €10 more.
- a Corsair VS450 PSU, 80+ certification and huge quality that you can afford at €41* (as I did, for instance). Bought because didn’t plan about a GPU, now regretting a bit if I have to tell you.
- and at the end, the Carbide Spec-03. Fancy ATX case, with a nice glass (plastic, in reality) panel, with 2 quiet Corsair fans inside (one LED and one not). Kept its price of €65.
Prices are referred to those on Amazon.it in March 2017
So you could ask… why not a more powerful PSU? Why not a dedicated GPU instead of that sh$!ty HD 630? And moreover, why not a damn SSD? Well. I was a stupid. A very poor stupid. Dind’t think and didn’t have money. Moreover expecially in these months, along with the price of high end GPUs for bitcoin mining (thanks dears, hope you to loose all the bitcoin you mined), both italian physical and virtual shops (like Amazon) well thought to increase prices. For everything! Even CPUs, low end GPUs and SSD. Those in particular actually costs almost the double of the “real” price.
About the Motherboard, totally worth it. H serie because I didn’t need the Z feautures, and also because as a (poor) student, I don’t have enough money to afford a Z Mobo and a K CPU. Anyway nice to see, very well built and managed by MSI softwares in Windows. With Hackintosh… you know, newer not always means better, expecially if you basically adapting a closed source OS with non proprietary hardware. But some patches, and I was good to go.
The CPU… DAMN, if I hated it! I mean, it’s actually powerful an power-friendly, but the price was actually a bit high IMHO. And as I told before… It was a mess let it work in Sierra, until finally the 2017 Mac serie came out, along with their new Kaby Lake models. That made everything ALOT EASIER. In fact, before the 10.12.6 update (with the new Kaby Lake kernel support), in order to let Kaby Lake run you had to spoof your CPU and GPU ID, and some of the times it wouldn’t even boot after that (like in my case .-.). Make the GPU work with full acceleration was a mess, but at the end instead of the fu$!ing 7mb of virtualized nvram, I managed to get the GPU working along all its 1536 MB of memory. And then, thanks to the 10.12.6 update, I finally also managed to power the CPU at its full power.
The following patches (needed in 10.12.5 or before in order to let the CPU and Integrated Graphics work) are indeed no more needed on Sierra 10.12.6 or in any version of the new Apple macOS version, High Sierra! (what a huge fantasy, though…)
1
2
3
4
<key>FakeID</key>
<dict>
	<key>IntelGFX</key>
	<string>0x19168086</string>
1
2
3
4
5
6
7
8
9
10
11
12
13
14
15
<key>Devices</key>
<dict>
	<key>AddProperties</key>
	<array>
		<dict>
			<key>Device</key>
			<string>IntelGFX</string>
			<key>Key</key>
			<string>AAPL,GfxYTile</string>
			<key>Value</key>
			<data>
			AQAAAA==
			</data>
		</dict>
	</array>
You could find my complete config.plist here.
2. BIOS Configuration
It may vary by your motherboard.
- Step 1: Load Optimised Default
- Step 2: In BIOS Tab Windows 8/10 Features = Other OS Storage Boot Option Control = UEFI
- Step 3: Peripherals Tab Initial Display Output = IGFX XHCI Handoff = Enabled (In USB Configuration)
- Step 4: Chipset Tab VT-D = Disabled Internal Graphics = Enabled DVMT Pre-Allocated = 64M
- Step 5: Save and Exit
3. What To Download
You need to download some files to get things work. These files are necessary for the entire session of the Mac OS installation.
3.1. Bootloader
Latest version of Clover Bootloader. This Bootloader let you boot both MacOS, Windows and Linux distros, all in one and with a customizable interface.
3.2. Utilities
They’re apps or scripts that will help you with the initialization, installation and configuration of Hackintosh. Download the latest version according to your macOS version
- Clover Configurator. If you encounter the 7mb bug use the Classic version instead of the Vibrant. This apps let you configure your bootloader settings with a fancy UI, instead than in command line (available also)
- UniBeast, MultiBeast and KextBeast. Those apps respectively let you create a bootable USB, configure your Hackintosh machine and install some primary drivers in post-installation
- Toleda’s audio_cloverHDMI-130.command. This script basically allows you to enable in a few clicks the HD630 onboard audio.
3.3. Kexts
Kexts are basically drivers, which let you use your devices in a plug&play-like way.
- AppleALC.kext by vit9696 - Github repo here
- Lilu.kext by vit9696 - Github repo here
- Shiki.kext by vit9696 - Github repo here
- XHCI-200-series-injector.kext by RehabMan - Github repo here
- USBInjectAll.kext by RehabMan - Bitbucket repo here
Other kexts you’ll need later: (in post installation, with MultiBeast)
- AtherosE2200Ethernet.kext
- FakeSMC.kext
- IntelMausiEthernet.kext
- RealtekRTL8111.kext
4. Installation
4.1. Prerequisites
- A 200 Series Motherboard with Intel 7th Gen (KabyLake) Processor
- A working Mac, Hackintosh or Virtual Machine (VM is not reccomended though) - without one of those you can’t move forward.
- USB stick, 16GB or larger (some reported they got it working even with an 8GB stick, not my case though)
4.2. Get macOS
- Go to your Mac, Hackintosh or VM and open the Mac App Store
- Log in with your Apple ID
- Download macOS Sierra (10.12.6) or High Sierra - this guide is based on 10.12.6, but is appliable even to High Sierra with some modifications
- After the download finishes the setup screen will appear you should Quit the app from the Dock. You can see the application in /Applications/Install MacOS Sierra.app
4.3. Preparing USB
If the below guide didn’t work for you then try this one instead
- Open Disk Utilities –> Select USB and Erase using Mac OS extended (journaled) –> GUID Partition Map –> Erase
- Then open Unibeast –> Choose USB –> Then Select UEFI –> After that select Sierra
- Open USB’s EFI partition –> EFI/Clover –> Open config.plist Using Clover Configurator
- Make the necessaries edits (not needed in our case)
In case you have a build equal or very similar to mine, rename the existing conf.plist as orig-config.plist and paste mine there.
Move ALL the downloaded Files into USB, create a folder and paste it there.
4.4. USB ports tweaking
Not needed with my config.plist
After Creating Bootable USB, you should do some tweaks on the USB if your motherboard has USB 3.0+ Port. If you have just USB 2.0, then the below steps is not needed, although I reccomend you to follow these steps anyway
Add these configurations in config.plist using Clover Configurator. (Patches already applied in my config.plist)
Increase port limit
Kernel and Kext Patches –> KextToPatch –> +
1
2
3
4
Name: AppleUSBXHCIPCI
Find: 83bd74ff ffff10
Replace: 83bd74ff ffff1b
Comment: Increase port limit
Rename EHC to EH0
ACPI –> DSDT –> Patches –> +
This two patches would let USBInjectAll.kext load:
1
2
3
Comment: change EHC1 to EH01
Find: 45484331
Replace: 45483031
1
2
3
Comment: change EHC2 to EH02
Find: 45484332
Replace: 45483032
Move USBInjectAll.kext & XHCI-200-series-injector.kext to USB’s EFI partition /EFI/Clover/kexts/Other.
4.5. Install MacOS Sierra
- Turn on the computer
- Press the hotkey Canc to choose boot device (it may differ on your motherboard)
- Select USB
- At Clover boot screen, select Boot MacOS from USB
- When you arrive at the Installer, choose a language.
- In the top menu bar select Utilities and open Disk Utility
- Highlight your target drive for the Sierra installation in the left column.
- Click Erase button
- Name: type Sierra (You can rename it later)
- Format: choose Mac OS extended (journaled)
- For Scheme: Choose GUID Partition Map
- Click Erase
- Close Disk Utility
- Highlight your target drive for the Sierra installation then click Continue.
- After the first restart press the hotkey Canc to choose boot device
- Select USB
- At Clover boot screen, scegli Boot MacOS from the HDD you installed.
If you don’t know how to install MacOS then follow the steps in the Installation Guide
5. Post-Installation
After the successful installation, you must install necessary kext and patches to get things work. These are the same thing that we were doing after the installation of Windows OS. In Windows, drivers are in a package and it automatically installed within few clicks, while with macOS we should manually do these steps. As I said before, after the release of macOS 10.12.6 everything became easier because 10.12.6 brings the native support for Kabylake Processors. Also, tonymacx86 released a new version of the MultiBeast, which supports 200 Series Motherboard with 7th generation Kabylake processor. Imagine how many steps you had to do before…
5.1. Post Installation Using MultiBeast
- 1st Step = Copy all the downloaded files to the desktop.
-
2nd Step = Open Multibeast –> Quick Start –> UEFI Boot Mode
- 3rd Step = Drivers –> Audio –> Check both ALC1220 and 100/200 Series Audio. (I also select the 5.1 Output as I have it built onboard)
If you have different codec then select the codec that you want. Codec version can be found on the specification of your Motherboard
There are two methods to get Audio Work. This is the First Method. If it doesn’t work for you then try the method Two in “Post Installation Using Clover Configurator/Audio” Section.
-
4th Step = Drivers –> Network –> Check IntelMausiEthernet v2.3 (I also install RealtekRTL8111 v2.2.1)
-
5th Step = Drivers –> USB –> Check Increase Max Port Limit 200 Series
-
6th Step = Bootloader –> Check Clover + Emulated NVRAM
Note: After installing Multibeast don’t forget update clover to the latest version. You can do it via the Clover Configurator app or via the link above.
-
7th Step = Customize –> Graphics Configuration –> Select on Intel HD 6xx
-
8th Step = Final Build Configuration Build –> Install
5.2. Post Installation Using Clover Configurator
Not needed with my config.plist
5.2.1. Basic Configuration
- Open Clover Configurator, then mount EFI Partition if not mounted (Multibeast will automatically mount the EFI partition)
-
Fix Random Restart problem when system shutdown by Selecting FixShutdown_0004 under ACPI –> Fixes
- XMPDetection=Yes (If your RAM clock speed is higher than 2133MHz, like in my case)
Don’t Close Clover Configurator. Add all entries from the below steps or else you should open the Clover Configurator for every step.
5.2.2. HD Graphics 630 w/ QuickSync & iTunes DRM Contents
Open Clover Configurator if not open.
Add patches in DSDT
ACPI –> DSDT –> Patches –> +
1
2
3
Comment: change GFX0 to IGPU
Find: 47465830
Replace: 49475055
-
Add the bootflag shikigva=1 in Boot –> Custom Flags
-
Copy Shiki.kext and AppleALC.kext and paste them in to EFI drive/EFI/Clover/kexts/Other.
5.2.3. Second Audio Method
Open Clover Configurator if not open.
- Make sure that Lilu.kext and AppleALC.kext (if you use the above step then AppleALC will already be in the kexts/Other folder) are installed. If not install them.
- Add patches in Clover Configurator
Add patches in DSDT if not present.
ACPI –> DSDT –> Patches –> +
1
2
3
Comment: change HDAS to HDEF
Find: 48444153
Replace: 48444546
Change Audio ID to 1 or 2 if not.
In the latest version of AppleALC.kext, audio ID 1 or 2 or 11 is fully supported for ALC1220 and ALC1220A codecs.
Devices –> Audio –> Change it to 1 or 2 or 11
Run audio_cloverHDMI-130.command to get HDMI Audio working if you want. If this method of HDMI Audio didn’t work for you then follow the toleda guide on how to enable HDMI Audio.
5.3. SMBIOS
We need to change the SMBIOS to iMac 18.1 or 18.2 or 18.3 because these are the SMBIOS for the Kabylake processors. This is necessary because without SMBIOS the system will not boot and other features like power management, iMessage, Graphics acceleration won’t work.
For the perfect configuration of SMBIOS head over to this link and choose SMBIOS that matches your processor.
In my case, I changed the SMBIOS to 18.2 (cause it’s the SMBIOS of the i5-7500 powered iMac).
5.4. USB Power Management
Those who looking for the proper USB Power management go to the USB power property injection for Sierra (and later) Guide by RehabMan.
Also, don’t forget to add patches in Kernel and Kext Patches –> Kext To Patch
1
2
3
4
Name: com.apple.driver.usb.AppleUSBXHCIPCI
Find: 83bd74ff ffff10
Replace: 83bd74ff ffff1b
Comment: change 15 port limit to 26 in XHCI kext (100-series)
1
2
3
4
Name: AppleUSBXHCIPCI
Find: 837d8c10
Replace: 837d8c1b
Comment: Change 15 port limit to 24 in XHCI kext
As you may have seen I didn’t apply the first patch, because I didn’t need it.
5.5. iMessage
An iDiot’s Guide To iMessage is the best iMessage Guide we can found on the internet, just follow this guide straightforward.
6. Geekbench Scores
The results are very nice, considering we’re talking about an OS running on non-natively supported hardware.
7. Frequently Asked Questions
- Question: After the installation macOS won’t boot from the HDD drive. It only boots from the USB! Answer: In this case first of all you need to boot using USB. After you reached the desktop copy the entire EFI folder from USB to your Hackintosh. Then replace the one in the HDD’s EFI folder with that one you just copied.
- Question: How to enable NVIDIA Graphics card? Answer: Now NVIDIA releases the new web drivers for Pascal Graphics card. To get NVIDIA card work you need to download NVIDIA FixUP or simply select the NVIDIA Web option from the New Multibeast.
- Question: Will this guide work with all the motherboards? Answer: Yes, it will work but you have to select the suitable drivers from the post installation and make sure that the BIOS settings are matched with your motherboard.
8. Updating to the latest Version
Apple releases the updates in every one or two months. After using this steps, you can easily update it through your Mac App Store. Sometimes some error could occur. That’s why I raccomend you to keep a backup of your EFI folder and the most important file in another partition. Anyway if that happens let me know in the comment box or contact me to my mail, which you can find in the About page.
Graphics issue. After the update, if you can’t boot into desktop then disable Inject Intel from the Clover Boot/Options/Graphics Injector/Untick inject-intel. After you reach in desktop, Install Lilu.kext and IntelGraphicsFixup.kext into Library/Extension. If this didn’t help then follow the Graphics section from this guide. If your kexts are already installed, then you will not have any issues with the upgrade.
Make sure that the Audio is working because these two is the main part will have an issue after updating. If you had any trouble with the audio, then follow the steps from this Guide.
9. Thanks to
- jktaurus8 for his awesome guide.
- RehabMan
- GhostHitWall
- tonymacx86
- onmybikedrunk
- toleda
- P1LGRIM
- You, if you readed the entired guide. But if you did not… well… fy.